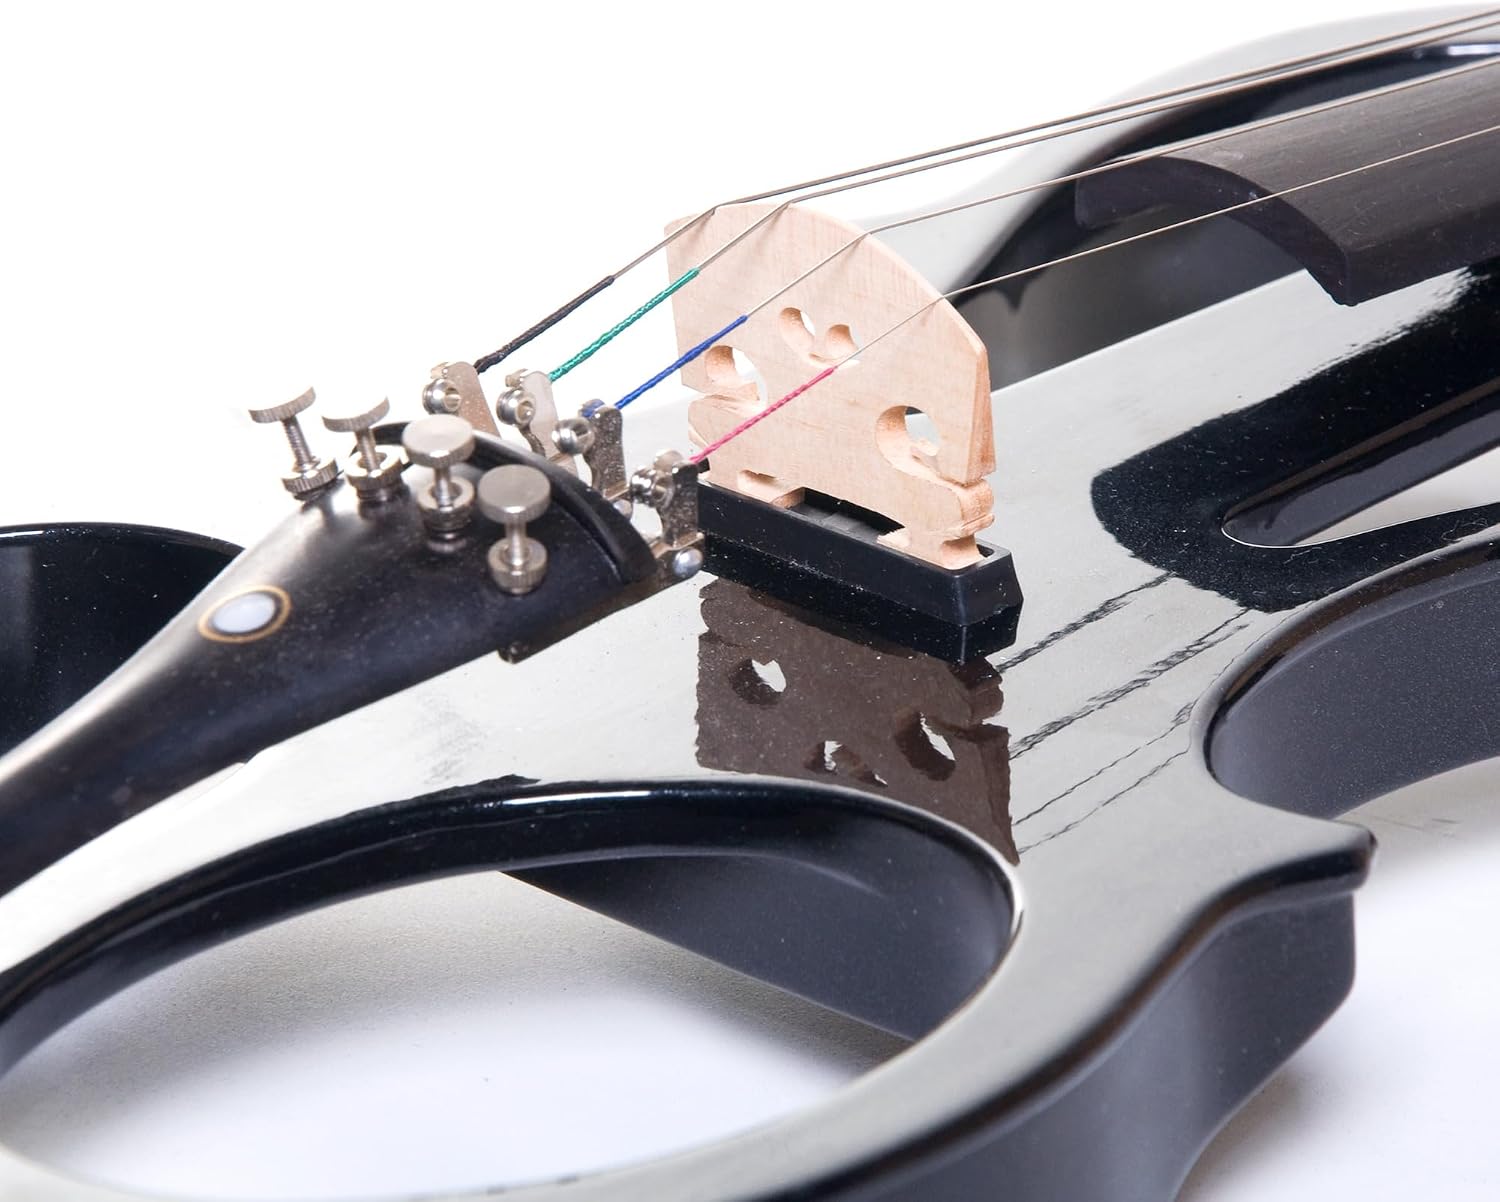
You did the sensible thing: you found a budget electric violin — an instrument that converts string vibrations into an electrical signal through a built-in pickup (a small transducer mounted near or under the bridge) rather than relying on a hollow wooden body to project sound — in the sub-$200 range, added it to your cart, and clicked buy. Maybe it’s for silent apartment practice at midnight, or to dip your toe into electric playing before committing to a four-figure NS Design. The instrument arrives, you tear open the box, and then reality sets in: the bridge (a small carved wooden piece that sits upright on the body and transfers string vibration to the pickup) isn’t installed. A peg slips. A string snaps. The bow looks like it survived something. This article is the guide you needed in the box. We’ll walk through every common out-of-the-box problem — drawing on patterns from aggregated owner reviews of Cecilio, Vangoa, and Pyle instruments — and give you clear if-then decisions at each step.
| EDITOR'S PICKPyle Full Size Electric Violin… | Mid-tierCecilio Solid Wood Electric/Sil… | Budget pickCecilio Electric Violin 4/4 Ful… | |
|---|---|---|---|
| Body wood | Solid wood | Solid wood | Solid maple |
| Case included | ✓ | — | — |
| Tuner included | ✓ | — | — |
| Finish | — | Metallic red mahogany | Metallic black |
| Price | $199.99 | $151.99 | $119.99 |
| See on Amazon → | See on Amazon → | See on Amazon → |
The Setup Surprises Nobody Warns You About
The Bridge Situation
The single most common out-of-the-box complaint across budget electric violin reviews is the bridge arriving uninstalled, sometimes wrapped in tissue at the bottom of the case. This catches buyers completely off guard because on a standard acoustic violin, the bridge is always set before the instrument leaves the shop.
On budget electrics, the bridge doubles as the pickup housing on some models, or sits directly over a piezo disc (a thin crystal sensor that converts pressure into electrical signal). Manufacturers ship it loose to prevent damage in transit — a reasonable choice, but they rarely explain this prominently in the listing.
How to fit it correctly: The bridge foot should sit centered between the two f-hole (or f-hole-shaped notch) positions, perpendicular to the body. The back of the bridge — the flat face — should align vertically when viewed from the side. The treble foot (E-string side) typically sits slightly lower than the bass foot (G-string side) on most electric designs, though you should verify this against your specific model’s diagram. Violinist.com’s community forum threads on budget electric setup consistently advise checking the bridge angle before any tuning, because a tilted bridge will pull forward under string tension and can crack the top or misalign the pickup entirely.
If your model includes a piezo pickup integrated into the bridge, handle it with particular care — the sensor wire usually runs through a small channel in the bridge foot and into the body. Forcing the bridge in any direction risks severing that wire, which is a non-warranty repair on a $100 instrument.
Pegs That Won’t Hold Pitch
Friction pegs — the tapered wooden or plastic pegs that run through the pegbox and hold the strings — are the weak link on budget electrics. Owners of Vangoa models in particular report strings detuning within minutes of initial setup, sometimes mid-tuning.
The physics are simple: the peg shafts and pegbox holes need enough friction to hold but enough slip to turn smoothly. Budget instruments often arrive with peg holes slightly too large or shafts too smooth, especially after manufacturing tolerances that favor cheap plastic over properly fitted wood.
The rosin fix (it actually works): Multiple Vangoa owners across aggregated review pools report that rubbing a small amount of bow rosin — the sticky pine resin you apply to bow hair to create friction — directly onto the peg shafts before reinserting them provides enough grip to hold pitch reliably. Apply lightly, reinsert, and push the peg firmly inward as you turn. The “push-in while turning” motion is the core technique: you’re pressing the peg deeper into the taper while rotating, creating a mechanical lock.
If rosin doesn’t solve it after a few tries, a product called peg compound (also called peg dope) — available from any violin supply source — is the proper solution. It’s a blend of soap and chalk that simultaneously lubricates the peg for smooth turning and adds grip to prevent slipping.
String Breakage: Why It Happens and How to Prevent It
A 4-star Vangoa reviewer specifically flagged string breakage during initial tuning on their child’s instrument — and this is one of the most avoidable problems at this price tier once you understand the mechanism.
Budget instruments ship with steel or steel-core strings tensioned down to reduce shipping stress. When you tune up to pitch for the first time, you’re asking those strings to climb several full tones in tension very quickly. Two things go wrong:
-
Over-tightening the fine tuners before the pegs are set to approximate pitch. Fine tuners (the small metal screws at the tailpiece end) are designed for tiny adjustments — a half-step at most. If you’re trying to raise pitch from slack using only the fine tuners, you’re threading the adjuster to its mechanical limit and concentrating stress right at the string’s ball end, which is exactly where breaks occur.
-
Sharp edges at the nut or bridge. On budget instruments, the nut (the small grooved piece at the pegbox end that spaces the strings) and bridge notches are often not properly filed. A string crossing a sharp corner under rising tension will snap at that contact point. String players at Stringsmagazine.com have long noted that nut slot finishing is one of the first places manufacturers cut costs on entry-level instruments.
If X, then Y: If your string broke at the nut or bridge contact point, smooth the groove gently with a fingernail or the edge of a toothpick before restringing. If it broke at the fine tuner, back the tuner out fully before installing the new string, set pitch at the peg first, and use the fine tuner only for the final 10–15 cents of adjustment.
The “Silent” Practice Reality Check
This is the expectation that generates the most post-purchase surprise. Budget electric violins are marketed with language like “silent practice” and “perfect for apartments.” One Cecilio owner put it directly: the instrument is “quieter than acoustic but still gives off its own sound due to vibrations.”
They’re right, and the physics explain why. An electric violin’s body — whether solid wood, foam-core, or carbon composite — still vibrates when the bow moves across the string. That mechanical vibration transmits through the instrument to the shoulder rest, through your collarbone, and into the air around you. It doesn’t project the way an acoustic instrument does, but it’s not inaudible.
By the numbers — what to realistically expect:
| Instrument type | Approximate unamplified volume |
|---|---|
| Standard acoustic violin | ~85–92 dB at player’s ear |
| Budget solid-body electric (unplugged) | ~55–65 dB at player’s ear |
| Silent practice mute on acoustic | ~60–70 dB at player’s ear |
MusicRadar’s electric violin coverage consistently notes that “silent” in this context means “significantly reduced,” not “inaudible.” For late-night apartment practice, the difference is real and meaningful — you won’t wake neighbors through a standard wall. But if you share a room or live in exceptionally thin-walled housing, you’ll still hear the instrument and so will anyone nearby.
The correct mental model: a budget electric violin gives you roughly the same acoustic footprint as practicing with a heavy rubber practice mute on an acoustic. That’s a genuine benefit, just not the zero-noise experience some buyers expect.
The Included Accessories: Worth Using or Trash?
Budget electric violin kits typically include a bow, rosin, a headphone amplifier (a small battery-powered device that lets you hear yourself through headphones without a full amp), a quarter-inch instrument cable, and sometimes a carrying case.
Honest assessment based on aggregated owner reports:
-
Bow: Reviewers across Cecilio and Pyle kits consistently describe the included bow as functional for learning fundamentals but fragile. One Pyle owner reported the bow “exploded” — the hair separated from the tip block on first rosin application. Budget bows use lower-grade Brazilwood or unspecified wood and synthetic hair. For a beginner learning bow hold, it’s usable. For anyone with prior acoustic experience who applies normal bow pressure, it’s a risk. Sweetwater’s product Q&A for entry-level string instruments frequently echoes this: the bow is the first thing to consider upgrading.
-
Quarter-inch cable: Pyle kit owners specifically flagged factory-frayed cables arriving with visible jacket damage. Inspect yours before plugging into any amplifier. A damaged cable won’t just produce noise — it can short circuit the output jack on the instrument and damage the preamp on a headphone amp.
-
Headphone amp: Generally functional enough to confirm the pickup works and practice with monitoring. Don’t expect tone quality; expect a tool for checking signal chain.
-
Rosin: Usually adequate. Rosin is rosin at this level.
If X, then Y: If you played acoustic violin before this purchase, upgrade the bow first — your existing technique will immediately expose the bow’s limitations. If you’re a true beginner, use what came in the box for 30–60 days until you’re applying consistent bow pressure, then upgrade.
The First Upgrade: Where Your Money Does the Most Work
After 30–90 days on a budget electric violin, most owners hit the same ceiling: the instrument works, but something feels limiting. Based on owner feedback patterns across Cecilio CEVN-1 and similar sub-$200 instruments, the upgrade priority typically runs in this order:
-
Strings — factory-installed strings on budget instruments are rarely high quality. A set of dedicated electric violin strings (D’Addario Prelude or Helicore Light are commonly cited starting points in Violinist.com discussions) costs $20–35 and meaningfully changes both feel and tone through the pickup. This is the highest-ROI upgrade at this tier.
-
Bow — if you have prior playing experience, a Glasser fiberglass bow or a carbon composite bow in the $40–80 range will outperform the included wood bow in durability and consistency.
-
Headphone amp or preamp — the included headphone amps in budget kits produce serviceable but flat tone. An outboard headphone amp with basic EQ opens up the tonal range of even a modest piezo pickup.
The instrument body itself — the actual electric violin — is rarely the first bottleneck. Budget electrics transmit signal reasonably well; the accessories around them are usually the weak link.
Frequently Asked Questions
Does the bridge come installed on budget electric violins, or do I have to fit it myself? On most budget models (Cecilio, Vangoa, Pyle), the bridge ships uninstalled and wrapped separately in the case. This is normal but rarely disclosed in listings. You’ll need to position and fit it yourself — look for a diagram in the manual or the manufacturer’s instructional content. The bridge should sit perpendicular to the body between the f-hole markers.
How do I stop the tuning pegs from slipping on a cheap electric violin? The fastest fix: rub bow rosin directly on the peg shaft before reinserting. The stickier surface adds friction. For a more durable solution, peg compound (peg dope) from any violin supply source is the proper tool. Always push the peg inward while turning — that’s what seats the taper and holds the pitch.
Will a budget electric violin actually be silent enough for apartment practice? It will be significantly quieter than an acoustic — roughly equivalent to an acoustic with a heavy practice mute. You’ll hear it, and someone in the same room will too. It’s unlikely to penetrate walls at neighbor-bothering levels during normal practice hours, but it is not inaudible.
Are the included strings, bow, and headphones worth using or should I replace them immediately? Use the strings and headphone amp to start. Inspect the cable before use — if it shows fraying, replace it before plugging in. If you have acoustic violin background, consider upgrading the bow within the first month; if you’re a beginner, the included bow will serve while you build fundamentals.
Why do my new strings keep breaking when I try to tune up? Most breaks happen for one of two reasons: tuning up using only fine tuners (which overextend the adjuster and stress the string at the ball end), or sharp nut/bridge slots that cut the string under tension. Set rough pitch at the peg first, then use fine tuners for final adjustment. Smooth any sharp contact edges gently before restringing.
What is the first thing I should upgrade after buying a sub-$200 electric violin? Strings, almost universally. A quality set of electric violin strings — D’Addario Prelude or similar — costs $20–35 and has a noticeable effect on tone and playability. It’s the single highest-impact, lowest-cost improvement available at this tier.
Your next step: If you’re past the setup phase and finding yourself wanting more output options or a cleaner signal, the logical move is to read through electric violin pickup and preamp fundamentals — understanding what your piezo is actually doing (and what its limitations are) gives you the frame to evaluate whether your next dollar goes into accessories, a better instrument, or outboard gear. That’s where the real mid-tier decision tree starts.